Introduction
It seems many people are not aware that the U8g2 library comes with a built-in subsystem to help developers build and configure user interfaces, called MUI. Since I couldn't find many examples online besides the official documentation, I decided to write a practical guide on how to set up and program a menu system using it. The purpose of this tutorial is to help others implement their own menu systems in their personal projects. For this explanation, I created two examples: one that runs on a PC and uses SDL2 to draw the menu, and another using an Arduino Uno R4 paired with a 128x64 GLCD display.
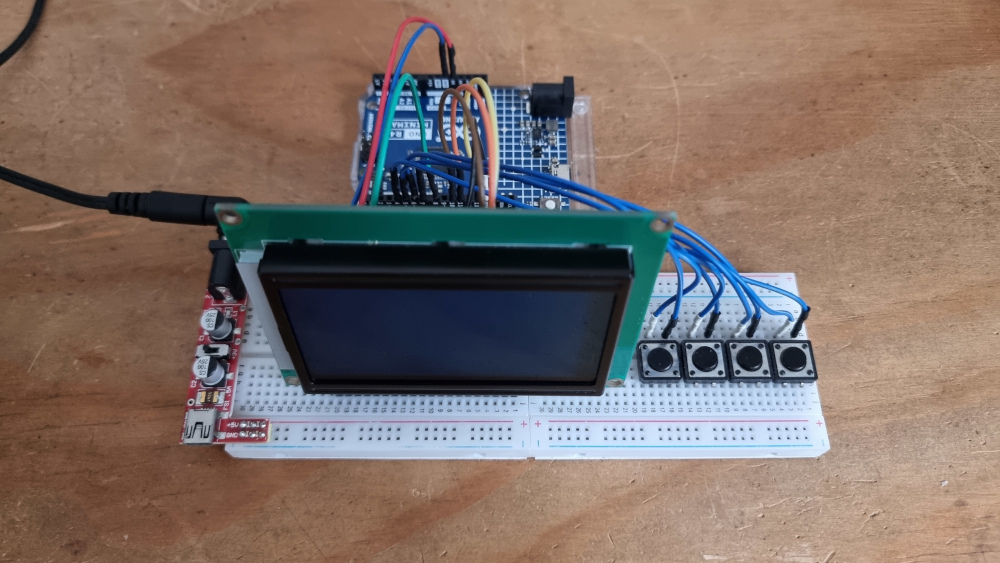
The code snippets in this article refer to the Arduino implementation. In addition to the GLCD display, this setup includes four buttons to navigate through the menu system and interact with the widgets."
MUI Concepts
Before we begin, it is important to understand two core concepts used by the library.
The first concept is the Form Definition String (FDS), which provides a declarative way to describe the elements inside a form (a concept similar to forms or windows in other GUI frameworks). According to the documentation [1], each form must be assigned a unique ID number ranging from 1 to 255 so the library's internal logic can identify it. Within this FDS, we also define the specific fields or widgets that will be displayed on that particular screen.
The second concept is the Field Processing Function (MUIF) [2]. This represents a list of functions used to process each widget or define the styles applied to them. Each MUIF configuration consists of a unique two-character identifier and an associated callback function. This callback is responsible for both rendering the element on the screen and processing its events when selected.
Next, I will explain how to set up and program a menu system using these two concepts. Please note that I will omit certain parts of the boilerplate code to focus strictly on the key components. You can find the complete source code in my repository [3]."
Programming a menu system
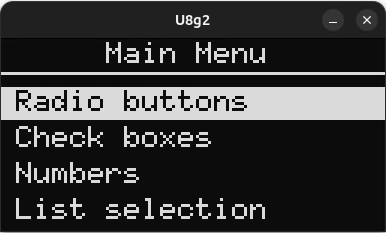
For this example, we will program a main menu featuring a list of six selectable items, each leading to a different sub-menu. Within these sub-menus, we will explore and implement various widgets offered by the MUI library.
Defining Forms and Widgets for the Menu System
The layout and behavior of our menu system rely on two main arrays. The first array, muif_list[], stores the field processing configurations for the types of widgets we will implement. The second array, fds_data[], contains the Form Definition Strings that declare the forms themselves and the widgets nested within them.
Before defining the layout, we must establish the font styles and styles applied to our interface elements. These are registered inside the muif_list[] array, where each style is assigned a numeric identifier. This ID is used later within the FDS to map specific styles to a widget or form. In addition to visual styles, this array is where we associate the custom callback functions that execute when a user interacts with a selectable widget.
For both the main menu and the sub-menus, we configure two primary components: the label widget used for the menu titles, and the corresponding font style. In this example, all titles share the same typographic style, which we have assigned to ID 0.
muif_t muif_list[] = {
    MUIF_U8G2_LABEL(),
    MUIF_U8G2_FONT_STYLE(0, u8g2_font_6x10_tr)
    ...
}
Next, we define the main menu and sub-menus within the fds_data[] array. For each menu screen, we specify its title and its corresponding numeric identifier. In the library's official examples, these form IDs typically follow this pattern:
- main menu MUI_01
- sub-menu MUI_10 "Radio buttons"
- sub-menu MUI_11 "Radio buttons 1"
- sub-menu MUI_12 "Radio buttons 2"
- sub-menu_MUI_13 "Radio buttons 3"
- sub-menu MUI_10 "Radio buttons"
The following code snippet demonstrates how I configured the main menu and its sub-menus. Notice how each form explicitly assigns its typographic style using the numeric identifiers established earlier:
fds_t fds_data[] =
  // ------ ELEMENTS FOR THE MAIN MENU ------
  MUI_FORM(1)
  MUI_STYLE(0)
  MUI_LABEL(35, 8, "Main Menu")   // Title
  MUI_XY("HR", 0, 11)             // Horizontal line below the title
  ...

  // ------ ELEMENTS FOR THE RADIO BUTTONS MENU ------
  MUI_FORM(10)
  MUI_STYLE(0)
  MUI_LABEL(25, 8, "Radio buttons")
  ...

  // ------ ELEMENTS FOR THE CHECK BOXES MENU ------
  MUI_FORM(20)
  MUI_STYLE(0)
  MUI_LABEL(30, 8, "Check boxes")
  ...

  // ------ ELEMENTS FOR THE NUMBERS MENU ------
  MUI_FORM(30)
  MUI_STYLE(0)
  MUI_LABEL(40, 8, "Numbers")
  ...
;
Implementing Widgets Within Main Menu and Sub-Menus
We declare the individual widgets within the fds_data[] array. For instance, the main menu defines a list of six buttons using the MUI_DATA macro, alongside the coordinate positions for the first four buttons displayed on the form:
fds_t fds_data[] =
  ...
  MUI_LABEL(35, 8, "Main Menu")   // Title
  MUI_XY("HR", 0, 11)             // Horizontal line below the title
  // Scrollable list of buttons
  MUI_DATA("GP",
      MUI_10 "Radio buttons|"
      MUI_20 "Check boxes|"
      MUI_30 "Numbers|"
      MUI_40 "List selection|"
      MUI_50 "Bar graph|"
      MUI_60 "Custom element")
  // Screen coordinates for the first four buttons
  MUI_XYA("GC", 5, 24, 0)
  MUI_XYA("GC", 5, 36, 1)
  MUI_XYA("GC", 5, 48, 2)
  MUI_XYA("GC", 5, 60, 3)
;
Each widget requires a two-letter identifier to bind it to the function that executes upon user selection. The MUI framework defines the specific arguments that each widget needs for its processing field. In our main menu example, the MUI_DATA widget uses the identifier "GP", which maps directly to the processing field entry: MUIF_RO("GP", mui_u8g2_goto_data). Then, we use the "GC" identifier to map the first four button to the corresponding processing field entry: MUIF_BUTTON("GC", mui_u8g2_goto_form_w1_pi).
muif_t muif_list[] = {
  MUIF_U8G2_LABEL(),
  ...
  MUIF_RO("GP",mui_u8g2_goto_data),
  MUIF_BUTTON("GC", mui_u8g2_goto_form_w1_pi),
  ...
}
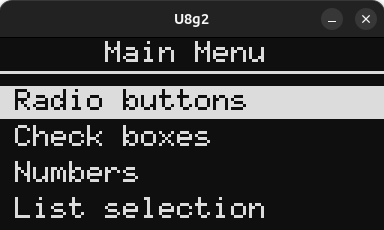
Here is how the menu renders on the screen:
To make things clearer, let’s look at the setup for the first sub-menu. Inside the fds_data[] array, we declare the two radio buttons that are going to be rendered on this screen. We use the identifier "RB" to bind these widgets to their corresponding processing field entry.
fds_t fds_data[] =
  ...
  MUI_LABEL(35, 8, "Main Menu")   // Title
  MUI_XY("HR", 0, 11)             // Horizontal line below the title
  ...
  // ------ ELEMENTS FOR THE RADIO BUTTONS MENU ------
  MUI_FORM(10)
  MUI_STYLE(0)
  MUI_LABEL(25, 8, "Radio buttons")
  MUI_XY("HR", 0, 11)
  MUI_XYAT("RB", 1, 25, 0, "Radio button 1")
  MUI_XYAT("RB", 1, 40, 1, "Radio button 2")
  ...
;
Next, inside the muif_list[] array, we define the actual processing field entry for our radio buttons. This is where we bind the specific callback function that executes when either of the radio buttons is selected.
muif_t muif_list[] = {
  MUIF_U8G2_LABEL(),
  ...
  MUIF_VARIABLE("RB", &rb_variable, mui_u8g2_u8_radio_wm_pi),
  ...
}
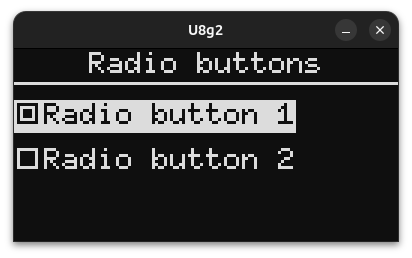
Here is how the radio buttons are rendered on the screen:
Implementing Menu and Sub-Menu Navigation Logic
For the Arduino example, I use the Button2 library [4] to handle the four physical buttons used to navigate the menu system. However, this specific library is not required for your own projects; you can easily adapt the system to work with any other input device, such as a rotary encoder.
The four physical buttons are mapped to the following functions: the UP and DOWN buttons move the cursor to the previous or next widget. The SELECT button is used to activate the widget where the cursor is currently positioned and execute its associated function. Finally, the BACK button allows the user to return to the previous form.
The MUI framework provides built-in functions that automatically handle cursor navigation and execute a widget's callback function, for example, transitioning to and displaying a sub-menu.
Specifically, we use mui_menu.prevField() and mui_menu.nextField() to cycle the cursor through the available widgets within a form. These functions are triggered directly when the user presses the hardware UP and DOWN buttons.
void up_button_tap(Button2& btn) {
  mui_menu.prevField();
  redraw_screen = true;
}

void down_button_tap(Button2& btn) {
  mui_menu.nextField();
  redraw_screen = true;
}
The SELECT button allows us to trigger the function of our chosen widget. In the case of our main menu, each item is configured to transition to a different sub-menu. By calling the mui_menu.sendSelect() function within our input handler, the framework invokes the specific callback function associated with that active widget.
void enter_button_tap(Button2& btn) {
  prev_cursor_position = mui_menu.getCurrentCursorFocusPosition();
  mui_menu.sendSelect();
  mui_SaveCursorPosition(ptr_mui_menu, prev_cursor_position);
  redraw_screen = true;
}
Here is the final project in action, running on the Arduino Uno R4:
The MUI framework makes designing clean, scalable menus for small displays remarkably efficient once you understand its core mechanics. I hope this guide gives you a solid foundation for building your own user interfaces.